Label Templates
Label templates let you design your own labels: text, data fields, barcodes, shapes and images laid out on a real label size. Items and locations then print with the template on a label printer, in the browser, or as a PDF sheet.
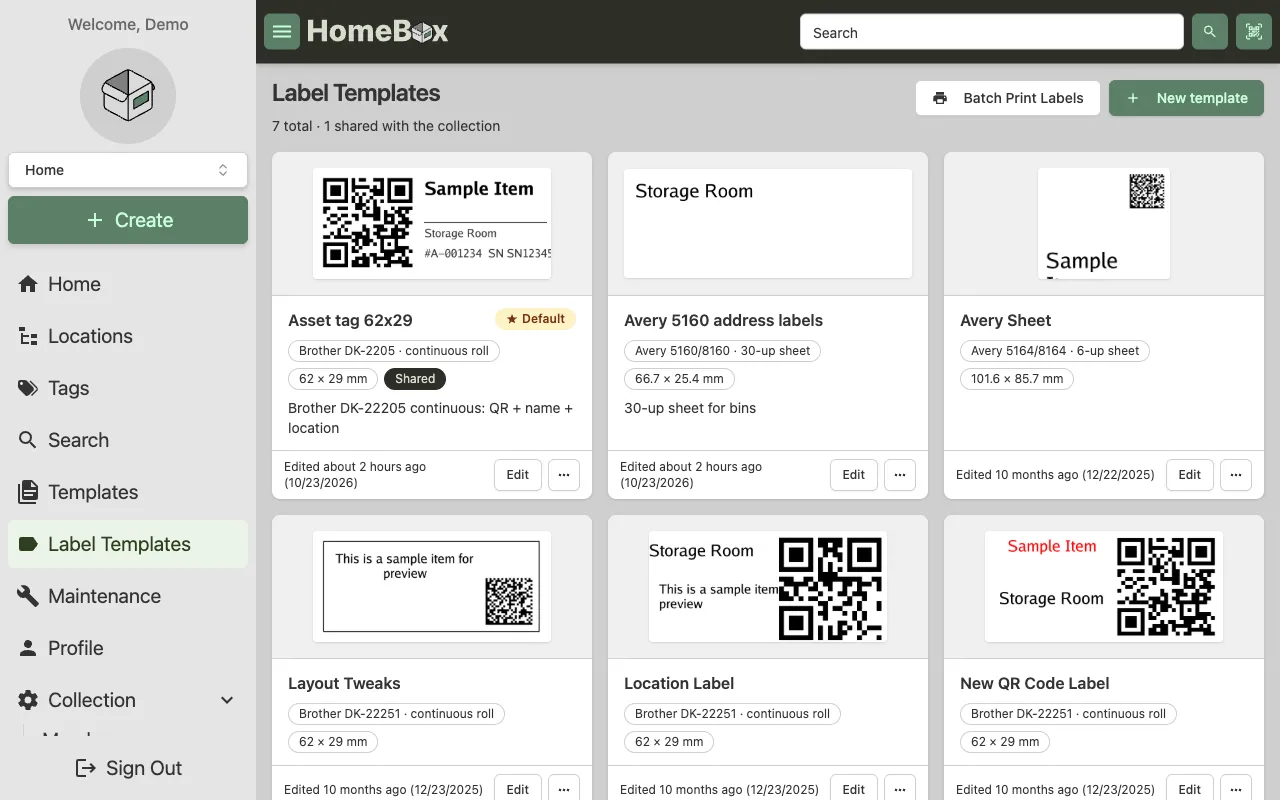
Open Label Templates in the sidebar to see your designs. Each card shows a rendered sample, the label stock it is made for and whether it is shared with the collection. The star badge marks your default template, the one that Quick print uses. Choose it from a card’s menu. The default is a personal preference synced with your account, so every member of the collection can pick their own.
Create a template
Section titled “Create a template”- Click New template.
- Name it and pick a label preset: Avery sheet labels, Brother DK rolls, Dymo and Brady die-cut labels and Zebra stock are included. Pick Custom to type any width and height in millimetres.
- Leave the resolution at 300 dpi unless your printer needs something else.
- Click Create. The editor opens with an empty label at the chosen size.
The editor
Section titled “The editor”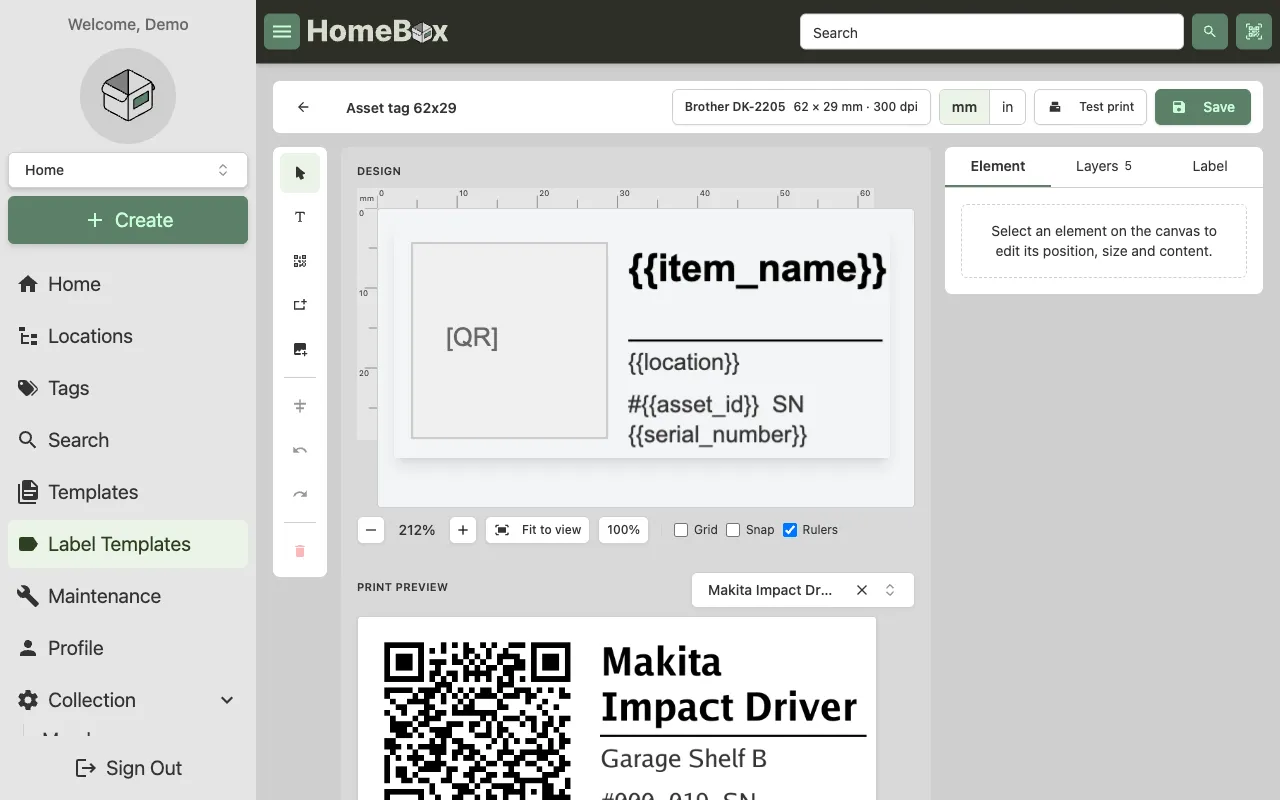
The editor has three parts:
- Tool rail (left): add text, a barcode, a rectangle or line, or an image. Below it: align the selection against the label edges (or, with several elements selected, against each other), undo and redo, and delete.
- Canvas (middle): the label at real proportions with rulers. Drag elements to move them, drag the handles to resize, double-click text to edit it. Zoom controls, grid, snap-to-grid and rulers sit under the canvas. The Print preview under the canvas shows the label rendered by the server for a real item.
- Inspector (right): tabs for the selected Element, the Layers list and the Label itself.
The header shows the label stock and size, a mm / in switch that changes every measurement in the editor (it sets the same Label Measurement Units preference found on your profile, which otherwise follows your locale), a Test print button and Save. An amber Unsaved changes badge appears as soon as you edit something, and the browser warns you before you leave with unsaved work.
Working with elements
Section titled “Working with elements”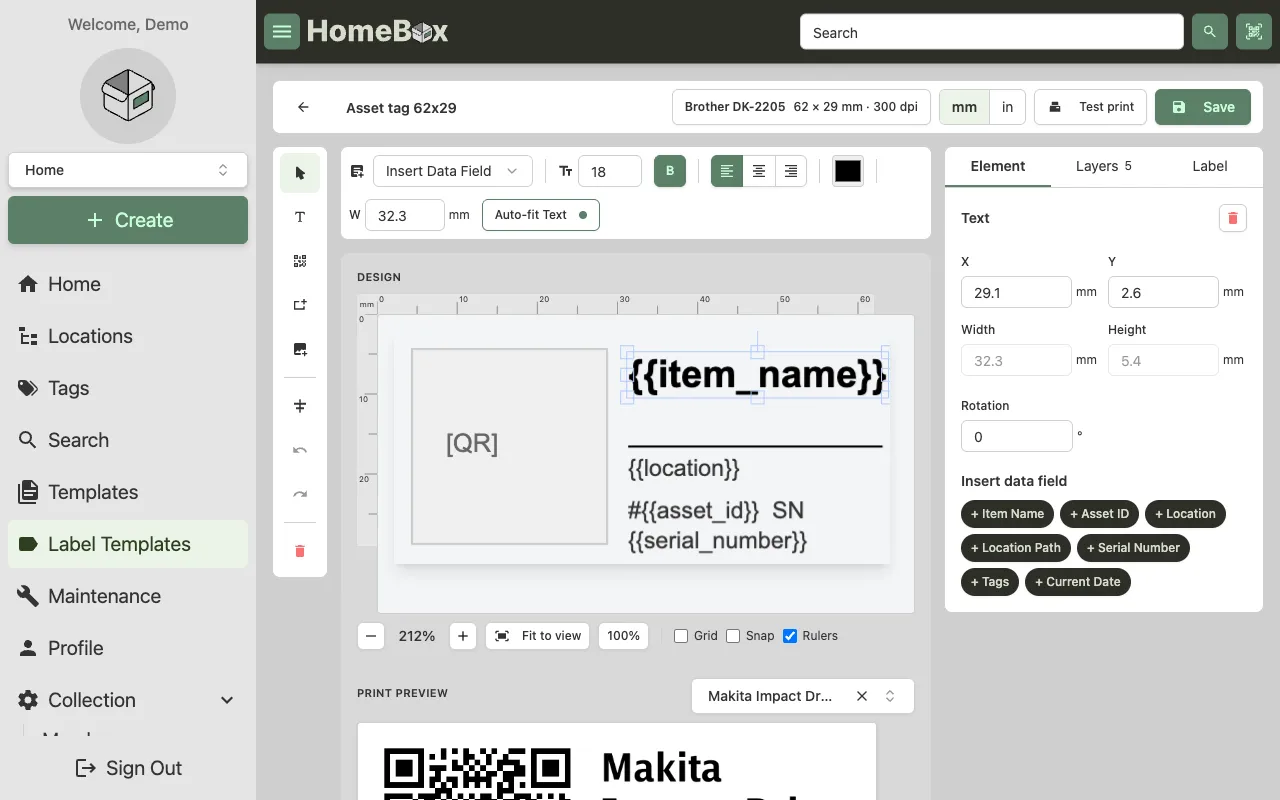
Selecting an element opens its properties in the Element tab: position, size and rotation in the unit you chose. Text elements also get a formatting toolbar above the canvas (size, bold, wrap, alignment, colour, box width; the space it uses stays reserved when nothing is selected, so the canvas never jumps) and an Auto-fit switch that shrinks the font until the text fits its box, which keeps long item names on the label.
A text element is a frame: drag its side handles to set the width and its top or bottom handles to set the height, or type both in the Element tab. With Wrap text on (the default for new text) long text wraps onto further lines inside the frame; with it off the text stays on one line. Either way nothing prints outside the frame: whatever does not fit is cut off at its edges, in the editor and on paper, so a two-line frame prints at most two lines of a long location path. Leave the height empty and the frame grows with its text instead. Text elements made before this version keep their old behaviour until you toggle Wrap text once.
Text can mix fixed words with data fields in double braces, for example Asset #{{asset_id}}. Use the Insert
data field menu in the toolbar or the chips in the Element tab. Items and locations are both entities, so every
field works on either kind of label:
| Field | Prints |
|---|---|
{{name}}, {{description}}, {{notes}} |
The name, description and notes |
{{asset_id}}, {{serial_number}}, {{model_number}}, {{manufacturer}} |
Identification fields |
{{location}}, {{location_path}} |
The location and its full path, for example Garage > Shelf B. On a location label this is the location itself |
{{tags}}, {{quantity}}, {{item_count}} |
Comma-separated tags, the quantity, and the number of items stored there |
{{item_url}}, {{location_url}}, {{asset_url}} |
Links back to HomeBox, handy inside a QR code. {{asset_url}} is the /a/<asset id> link, which keeps working if the asset ID moves to another item |
{{custom_<name>}} |
Any custom field, by name |
{{current_date}}, {{current_time}} |
When the label was printed |
Templates made with the older names ({{item_name}}, {{location_name}}, {{path}}, {{labels}}) keep working.
Barcodes are added from the tool rail. Pick the symbology (QR code, DataMatrix, Code 128, Code 39, EAN-13, EAN-8 or UPC-A) and what it should encode. Only compatible sources are offered: a numeric-only symbology such as EAN cannot encode a URL or an asset id, so it offers a Fixed value instead, a number you type in the Element tab that prints the same on every label. Linear symbologies (Code 128, Code 39) do not offer URLs or the item id either: a 60-character URL needs around 700 bars, more than a small label has printer dots, so those belong in a QR code or DataMatrix. The Element tab warns when a linear barcode would get fewer than two printer dots per bar at the template’s resolution; widen the element or pick a shorter source such as the asset id. The data source and fixed value of a selected barcode can be changed in the Element tab at any time. The canvas shows a placeholder; the print preview shows the real code.
Images such as a logo are embedded in the template, so keep them small (under 512 KB). PNG, JPEG and GIF work.
Shapes: a new rectangle is sized to the label with a 1 mm inset, so a frame is one click away; drag its handles to make it smaller. For a frame that is part of the label itself, use the Border setting in the Label tab instead.
Align: with one element selected, the Align menu moves it against the label edges or centres it. Shift-click or drag a box to select several elements and the same menu offers Align to selection, which lines them up against each other: left edges flush, centred on a common line, and so on.
Layers and the Label tab
Section titled “Layers and the Label tab”The Layers tab lists every element, top layer first. Click a row to select it, use the eye to hide it from the print, and the arrows to change the stacking order.
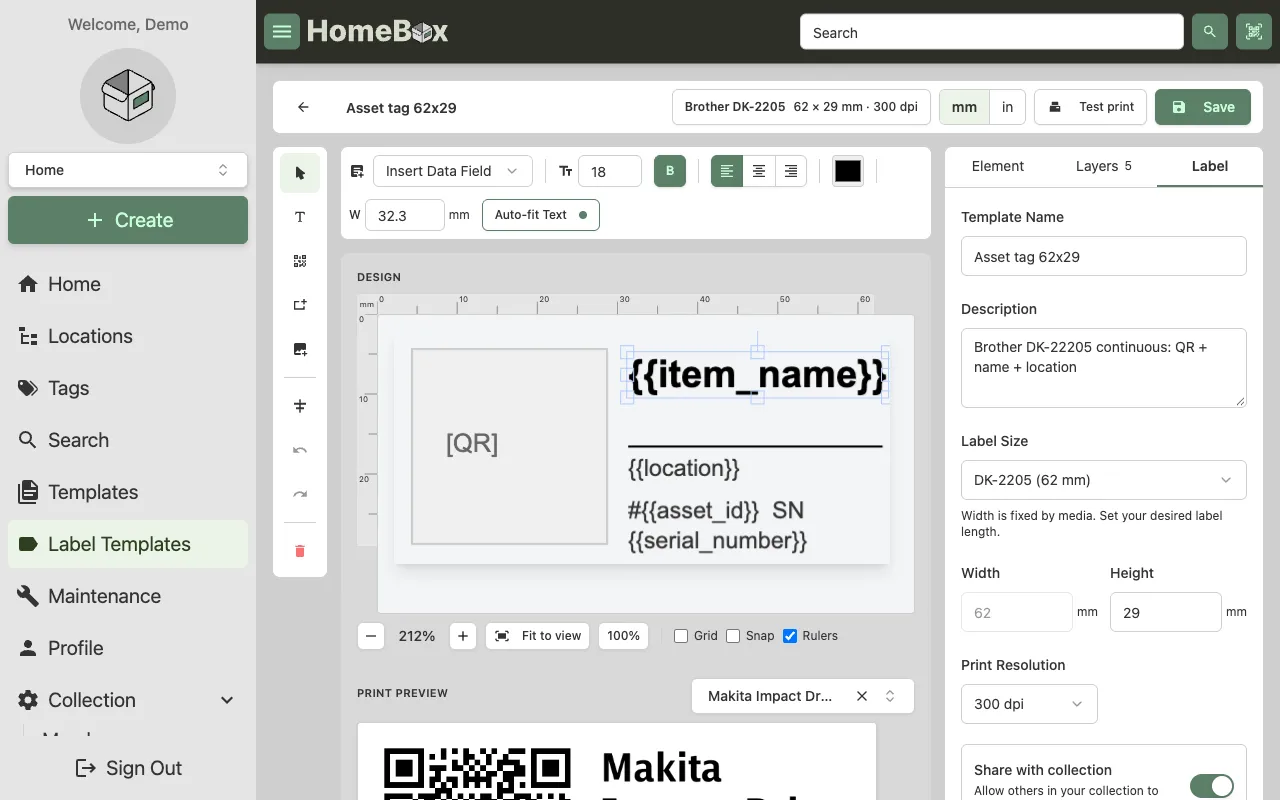
The Label tab holds everything about the template itself: its name and description, the preset and size, orientation, print resolution and the Share with collection switch. A Border switch frames the printable area with a line of the width, inset and colour you choose (default 0.3 mm, 1 mm in from the edge); it is drawn behind the elements in the editor and printed with every label. Display settings for rulers, grid and snap live at the bottom.
Preview and test print
Section titled “Preview and test print”Pick an item in the Print preview panel and the server renders the label with that item’s data every time you stop editing for half a second. This is exactly what will print. Test print sends one copy of that preview label through the server’s print command (see Server-side printing); it saves the template first if there are unsaved changes. If no print command is configured, the button tells you that server-side printing is not set up and you need to ask your administrator.
Keyboard shortcuts
Section titled “Keyboard shortcuts”| Keys | Action |
|---|---|
| Arrow keys, Shift + arrows | Nudge the selection by 1 px or 10 px |
| Delete or Backspace | Remove the selection |
| ⌘Z / Ctrl+Z, ⇧⌘Z / Ctrl+Y | Undo, redo |
On a phone the editor stacks: canvas on top, the add-element row below it, then the inspector tabs.
Printing
Section titled “Printing”From an item or location
Section titled “From an item or location”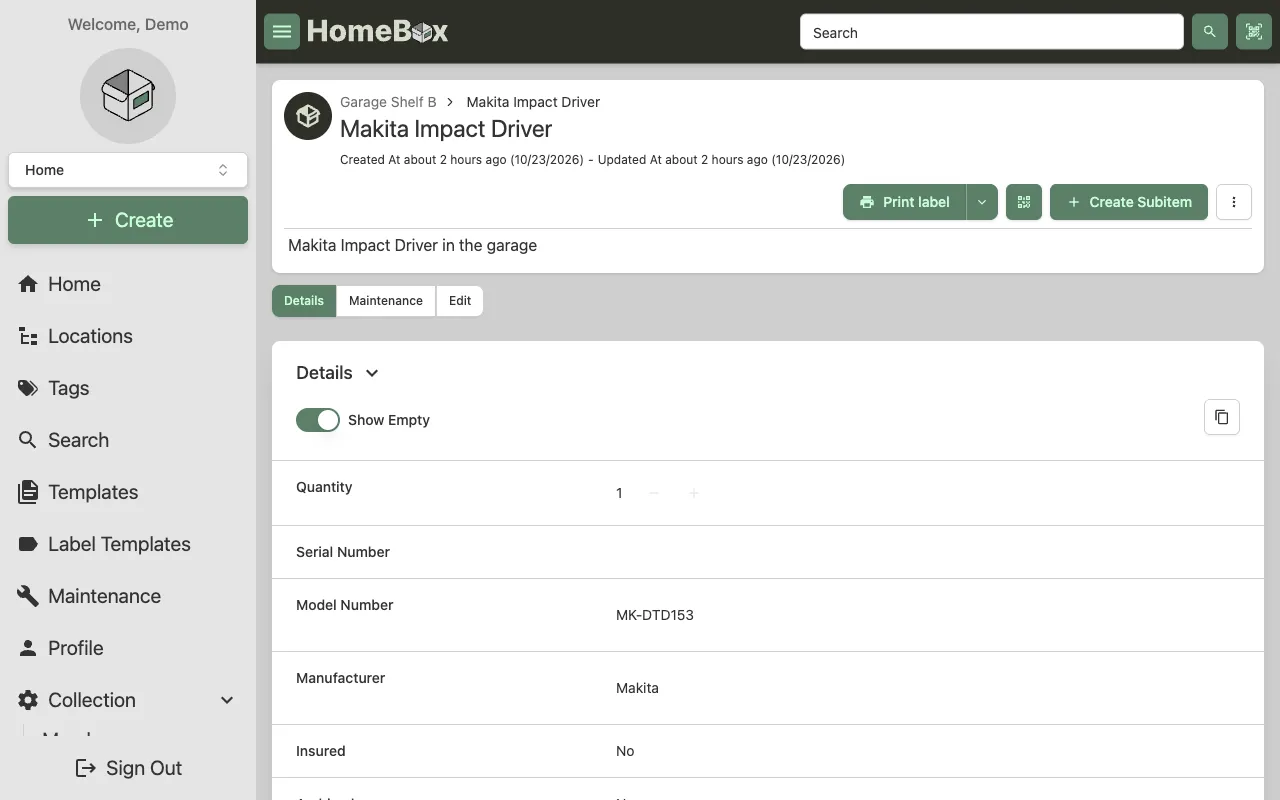
Every item and location has a Print label button. The main part does the quickest thing: when you have a default template and the server has a label printer configured, one click prints a single label. Otherwise it opens the print dialog instead.
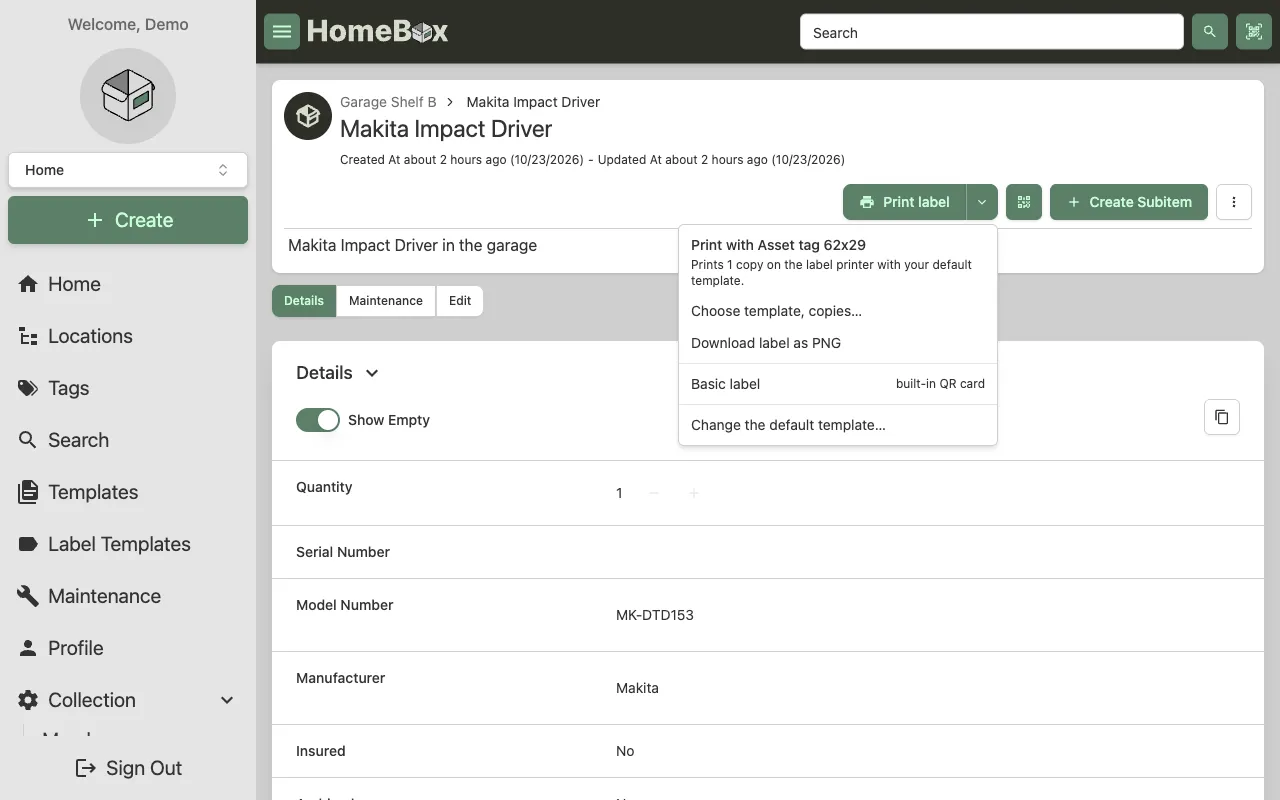
The arrow opens more options:
- Print with <template>, the one-click quick print with your default template on the server’s label printer.
- Choose template, copies… opens the print dialog.
- Download label as PNG renders the label with your default template.
The QR button next to it still shows a QR code for the page you are on.
The print dialog
Section titled “The print dialog”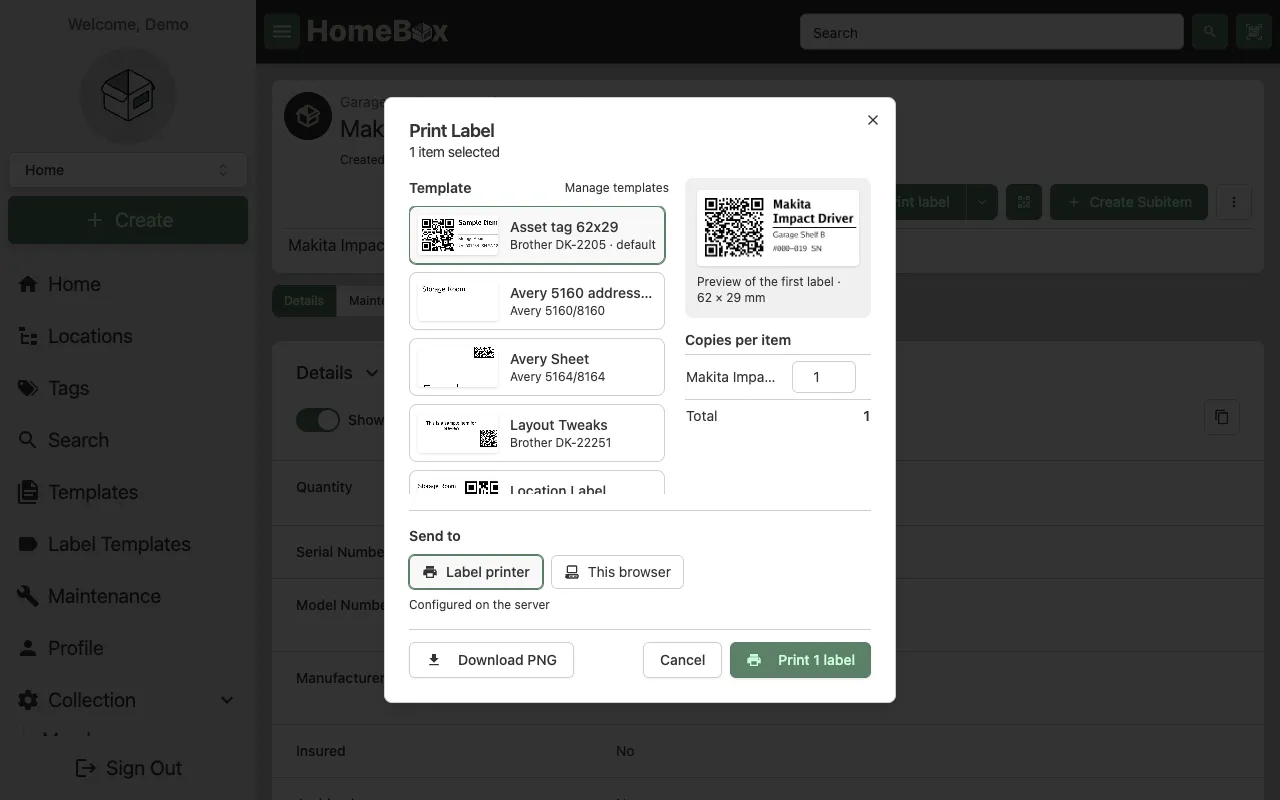
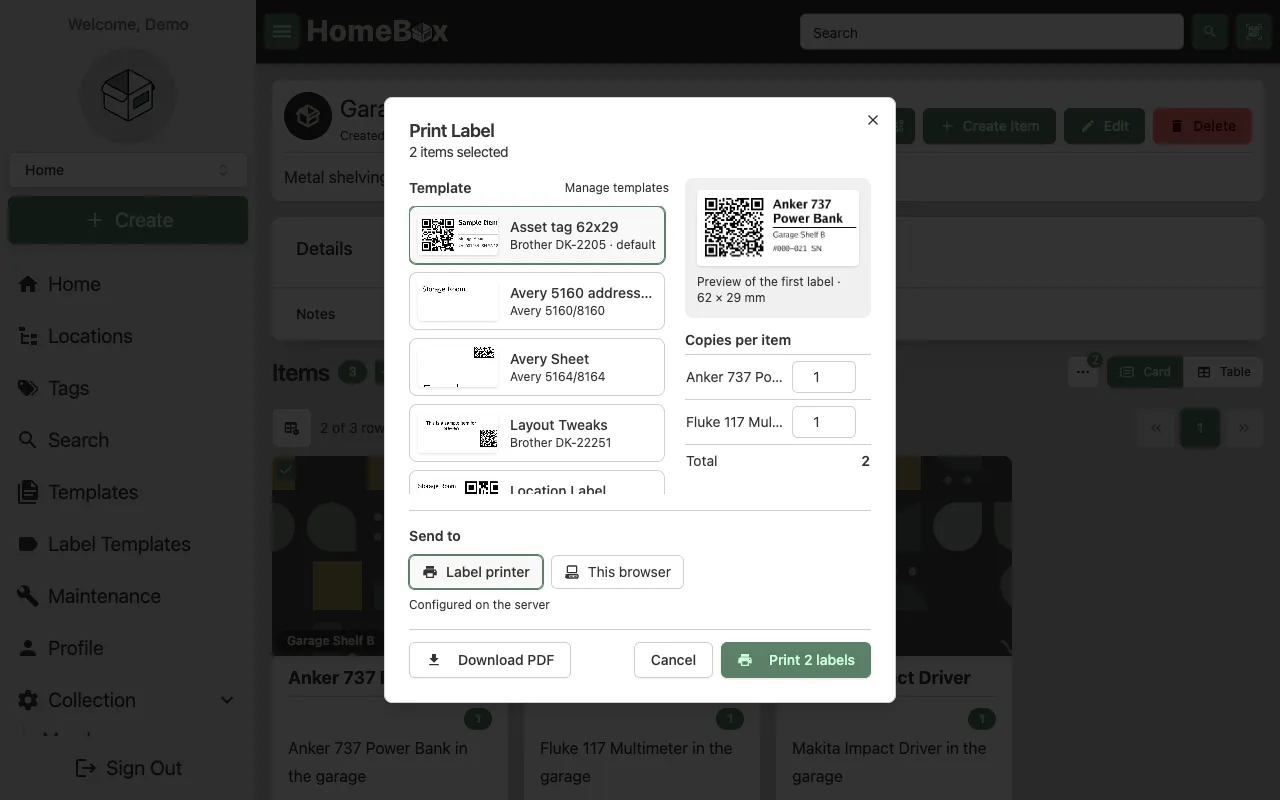
Templates are shown as cards with a sample, so you can tell them apart at a glance; your default is pre-selected. The preview on the right is rendered with the first selected item. Set the number of copies per item, then choose where to send the labels:
- Label printer, the printer attached to the HomeBox server. It only appears when the administrator has set a print command, and it is greyed out for sheet templates because the server prints one label at a time. When it is not available the dialog tells you to ask your administrator.
- This browser, which opens the label in a print window.
- Download saves a PNG, or a PDF when there is more than one label or the template is a sheet.
Several at once
Section titled “Several at once”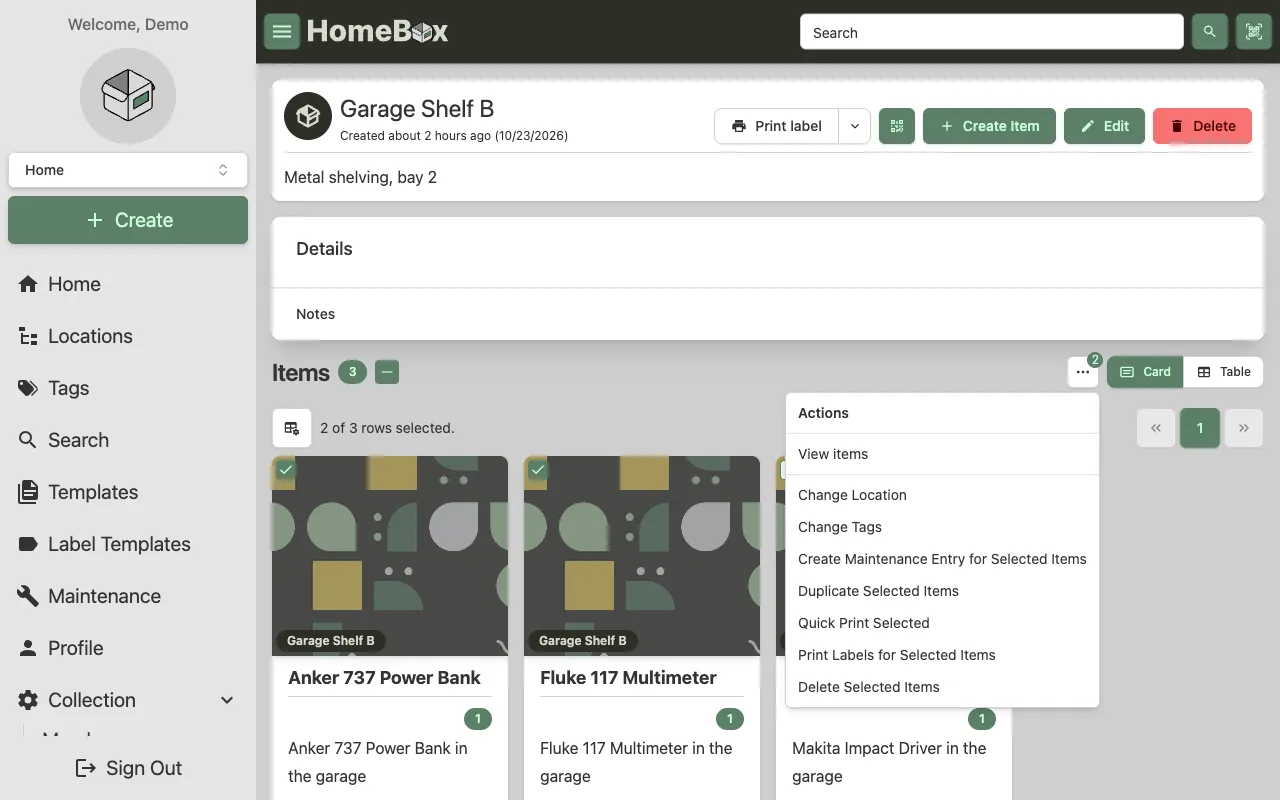
Select items in any list (home, search, a location or a tag) and open the ⋯ actions menu. Print labels for selected items opens the same dialog with a copies field per item. Quick Print Selected prints one label per selected item with your default template on the server’s label printer, without opening the dialog.
Batch print
Section titled “Batch print”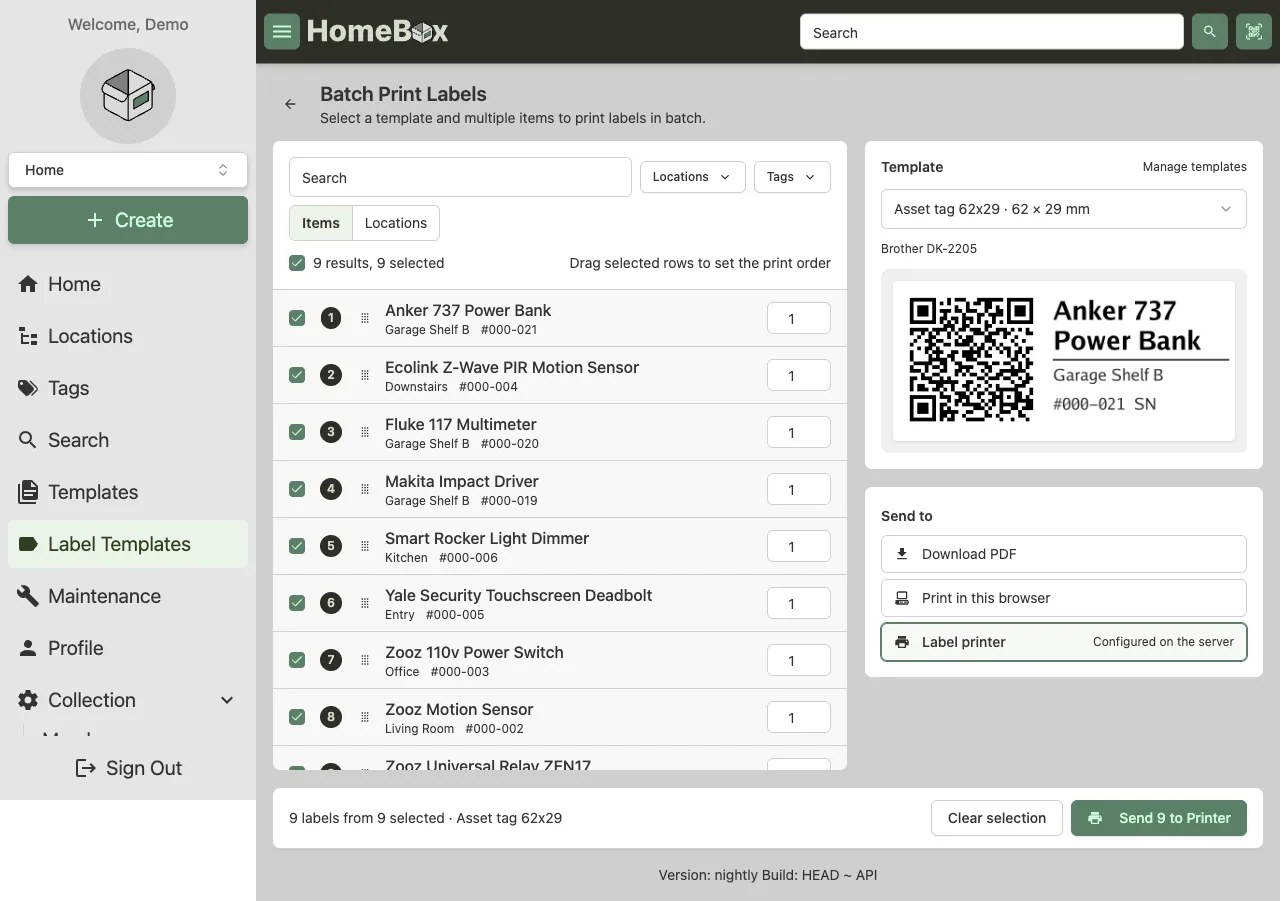
Label Templates › Batch print is for bigger jobs. Search and filter items (or switch to Locations), tick what you want, set copies per row and drag the selected rows into the order you want them printed. The right column holds the template, a preview and the destination (Download PDF, Print in this browser or Label printer); the footer sums it up and prints or downloads.
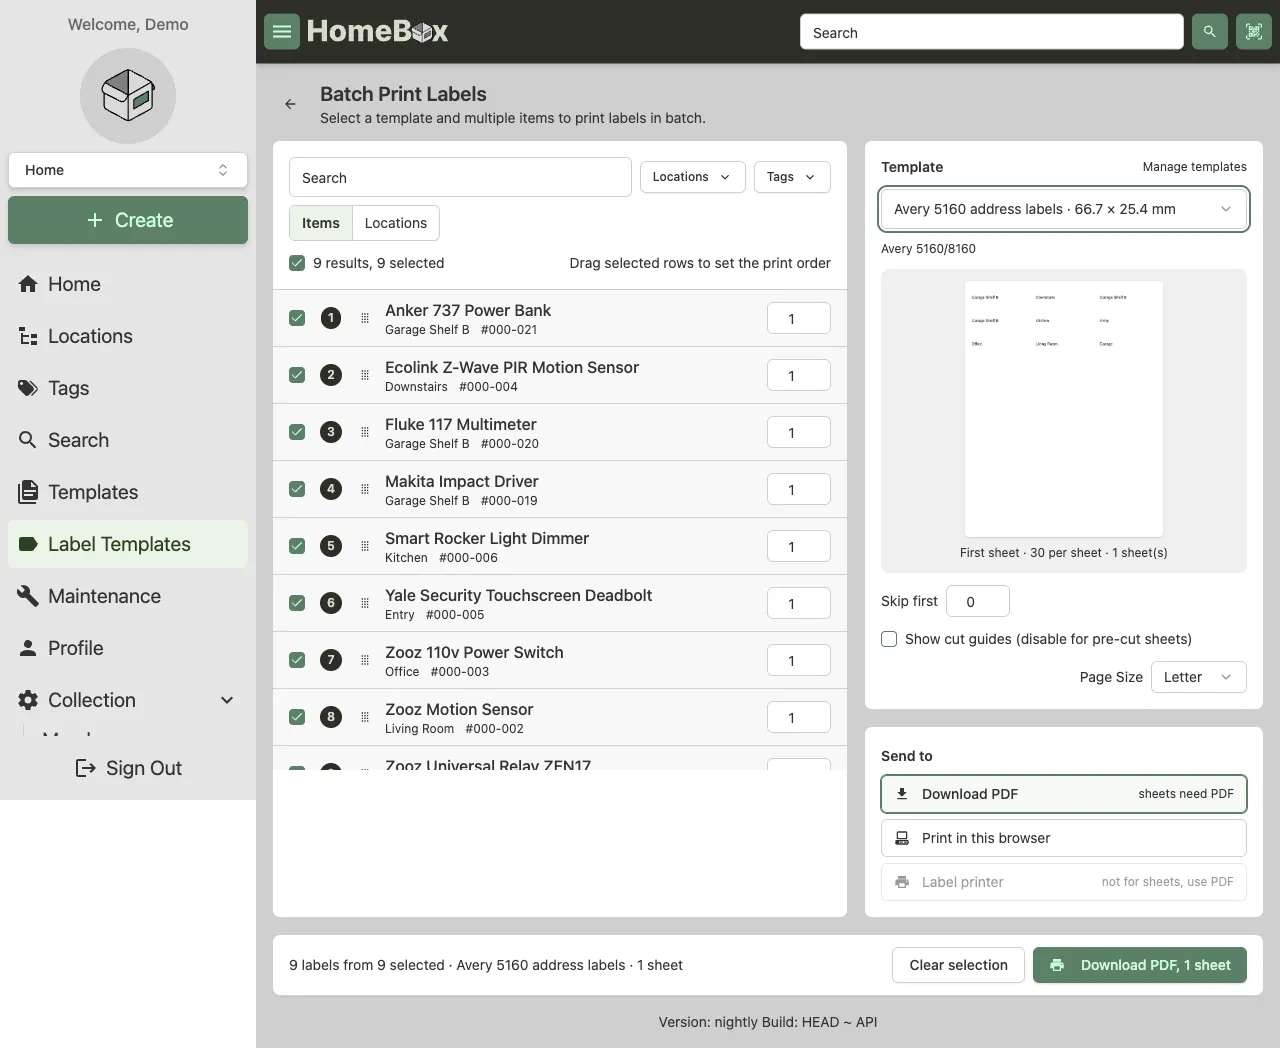
For sheet templates (Avery and similar) the preview shows the first sheet. Skip first leaves positions empty on a partly used sheet, cut guides adds thin borders for plain paper, and you can pick Letter or A4. Sheets always go out as PDF or through the browser; the label printer is greyed out because the server prints one label at a time.
Sheet layout and print offset
Section titled “Sheet layout and print offset”The Label tab has a Sheet Layout section with the page size, columns and rows, margins and the gaps between labels. Templates on an Avery or similar preset start with the preset’s measurements; change any of them to correct them for your sheets, and Reset to go back. Other templates can switch sheet printing on and enter their own sheet’s measurements. Picking a different preset drops a custom layout.
Print Offset moves every label on the page, to make up for a printer that prints a little off. Print a test page, measure how far the labels are from where they should be, and enter that; positive values move right and down. The offset applies to PDFs and sheets, not to the server’s label printer.
Asset ID labels
Section titled “Asset ID labels”Collection › Tools › Asset ID Labels prints tags ahead of time for a range of asset IDs with one of your
templates. Asset IDs already in use print with their item’s fields; unused ones get a label with just the asset ID
and {{asset_url}}, ready to stick on items as they arrive. Use {{asset_id}} and a QR code with the Asset URL
source for these templates. Skip first labels leaves positions empty on a partly used sheet.
Server-side printing
Section titled “Server-side printing”HomeBox does not talk to printers itself. To print from the server, the administrator sets
HBOX_LABEL_MAKER_PRINT_COMMAND in the environment or config file (it is not a UI setting). HomeBox renders the label
to a temporary PNG and runs that command, replacing {{.FileName}} with the file’s path. If the command uses
{{.Copies}} it runs once with the copy count; otherwise it runs once per copy. The same command also prints the
built-in basic label. For example:
# Brother QL printer on the network, 62 mm tapeHBOX_LABEL_MAKER_PRINT_COMMAND="brother_ql -b network -p tcp://192.168.1.50 print -l 62 {{.FileName}}"
# A printer shared through CUPSHBOX_LABEL_MAKER_PRINT_COMMAND="lp -d labelprinter {{.FileName}}"
Template labels can also use {{.Width}}, {{.Height}}, {{.WidthMm}}, {{.HeightMm}}, {{.Dpi}}, {{.TitleText}},
{{.URL}} and {{.Copies}}. See the configuration page for the full list.
Because the server does the printing, one tap prints from a phone or tablet too, with no browser print dialog, as long as the administrator has set the command. If it is not set, the Label printer destination is hidden; use This browser or Download instead, or ask your administrator.
Brother continuous tape
Section titled “Brother continuous tape”Continuous DK tape prints a little narrower than the tape itself, and the printer adds a feed margin of about 3 mm at each end of every label. Two consequences for templates:
- Make the template as wide as the printable width, not the tape width, so the image prints 1:1 instead of being scaled down by the print tool. The DK-2225 preset is already 35 mm wide for 38 mm tape; for other widths pick Custom and use the table below.
- Make the template about 6 mm shorter than the sticker you want. A 15 mm high template on 38 mm tape comes out as a sticker about 21 mm long.
| Tape | Printable width at 300 dpi |
|---|---|
| 12 mm | 9 mm (106 dots) |
| 29 mm | 26 mm (306 dots) |
| 38 mm | 35 mm (413 dots) |
| 50 mm | 47 mm (554 dots) |
| 54 mm | 50 mm (590 dots) |
| 62 mm | 59 mm (696 dots) |
| 102 mm | 99 mm (1164 dots) |
A working item label on 38 mm tape is 35 × 15 mm: a 15 mm QR code on the left, the name with Auto-fit and the asset id on the right. For locations, 35 × 30 mm with the name on top and a 20 mm QR code below leaves room for the path next to the code.
- Keep text inside the label with a small margin; label printers rarely print to the very edge.
- Give QR codes at least 15 mm on a 300 dpi printer so phones scan them from a shelf away.
- Use Auto-fit for item names and keep fixed-size text for labels such as “SN”.
- Make one template per label stock and share it with the collection; duplicate it to try variations.
- Export JSON in a template’s menu saves the design to a file you can keep or share, and Import JSON on the Label Templates page creates a template from such a file. Imported templates start private.
Troubleshooting
Section titled “Troubleshooting”Labels do not line up on a sheet. Use the preset for your exact Avery number, turn off cut guides, and print the PDF at 100% scale (no “fit to page”). If they are still off by the same amount everywhere, set a Print Offset; if the error grows across the page, correct the gaps in the Sheet Layout.
A barcode will not scan. Check the symbology supports the data: EAN and UPC need digits only. Make the barcode larger and keep white space around it.
The label printer does not print. HomeBox runs the print command and reports an error if it fails, so check the
server log first. Then run the same command by hand on the server, with a PNG file in place of {{.FileName}}. The
file HomeBox passes is a PNG at the template’s DPI, so the command and printer need to accept that. If the Label
printer destination is missing, no print command is configured.
A label prints a field name such as {{asset_id}} as text. Unknown fields print as nothing, so if you see the
raw placeholder the server is older than this behaviour; otherwise check the spelling of the field name against the
table above. Fields the entity has no value for print as nothing.
The preview does not update. Pick a preview item first; without one there is nothing to render. Use Refresh if the server was busy.